The Nightmare Before Christmas has long been a topic of debate among fans: is it a Halloween movie or a Christmas film? Personally, I believe it embodies the spirit of both holidays, making it a year-round delight! With characters like Jack Skellington stealing our hearts, it’s hard not to celebrate this film at any time of year. For fans of this classic, why not showcase your love with a fun DIY project? In this article, I will guide you through creating a sparkling Jack Skellington Bling Phone Grip that’s perfect for your phone or as a keychain!
Materials Needed for Your Project
Before diving into the crafting process, gather the necessary materials. You’ll need:
- 20ml of Amazing Clear Cast epoxy resin
- White metallic mica powder
- Black metallic mica powder
- Jack Skellington phone grip mold
- E6000 Adhesive with Precision Tips
- Black and white rhinestones
- Rhinestone picker tool
- Stir stick
- Mixing cup
- 91% alcohol spray
- Scissors or a craft knife
With everything ready, let's get started on this crafty adventure!
Step 1: Mixing the Epoxy Resin
Begin by preparing 20ml of Amazing Clear Cast epoxy resin according to the package directions. This involves pouring equal parts of the resin and hardener into a large mixing cup. Using a stir stick, slowly mix the two components together for about two minutes. The mixture should become clear; if you notice any cloudiness or streaks, continue stirring until fully combined.
Next, add a generous amount of white metallic mica powder to the resin. Stir again with a clean stir stick until the powder is evenly distributed. After mixing, let the resin rest for a few minutes to allow any bubbles to rise to the surface.
Step 2: Filling the Mold
Using your stir stick, pour the prepared resin into the bottom section of the Jack Skellington mold, filling it until you reach the top of his facial features. It’s crucial not to overfill at this stage! Allow the resin to sit for a few minutes, then lightly spritz it with 91% alcohol to eliminate any surface bubbles.
Let the resin cure in a well-ventilated area for at least four hours. Do not remove it from the mold during this time!
Step 3: Creating the Black Base
Once the initial layer has cured, prepare another 20ml of epoxy resin, following the same mixing instructions as before. This time, add black metallic mica powder to the mixture. As before, stir until fully combined and let it rest for a few minutes.
Carefully pour the black resin into the mold until it reaches the top, being mindful not to overfill. After allowing the resin to sit briefly, use the alcohol spray to eliminate surface bubbles. Let this layer cure for 12 to 24 hours, or until it no longer feels tacky to the touch.
Step 4: Demolding and Final Touches
The moment you’ve been waiting for: demolding! Gently remove the Jack Skellington piece from the mold. Use scissors or a craft knife to trim away any excess resin, and sand down the edges if necessary. If the resin feels flexible, allow it to cure longer in a warm area.
Next, prepare about 5ml of resin mixed with black metallic mica powder. Carefully pour this mixture into the open areas of Jack’s face—his eyes, nose, and mouth. Take care not to overfill, as this will require sanding later. Again, spritz with 91% alcohol and allow it to cure completely for about 12 hours.
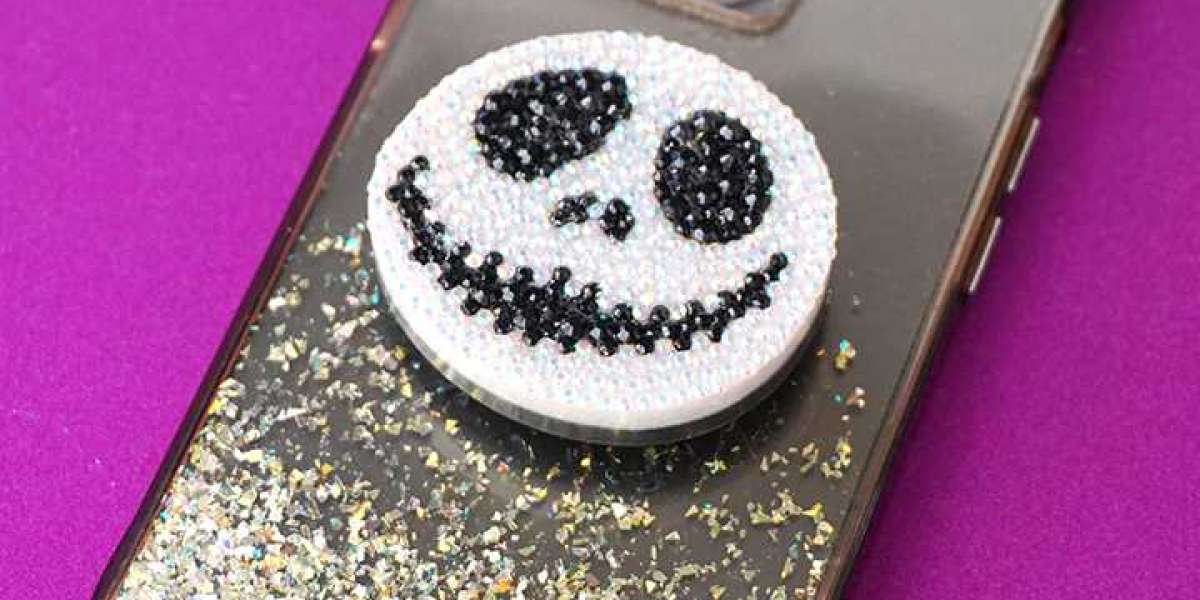
Step 5: Adding the Bling
Now comes the exciting part: adding rhinestones! Gather your E6000 Adhesive with Precision Tips, black and white rhinestones, and rhinestone picker tool. The precision tips are perfect for applying adhesive to small areas, allowing you to work efficiently.
I recommend working in small sections to ensure the adhesive doesn’t dry before you place the rhinestones. Start with one area, apply a thin layer of adhesive, and then carefully add the rhinestones, ensuring they are placed with the flat side down. Using a mix of larger and smaller rhinestones will help achieve a more dynamic look.
Continue this process until Jack is fully adorned with sparkling rhinestones. It took me about 30 to 45 minutes, but I found it relaxing, reminiscent of diamond painting—a craft I thoroughly enjoy!
Final Assembly
Once the adhesive has completely dried, attach the phone grip blank to the back of the resin piece. Ensure the adhesive is fully set to avoid any shifting of the rhinestones.
If you’d prefer not to make a phone grip, consider transforming this project into a keychain or a backpack charm. Simply twist an eye screw into the top of the piece and attach a keychain.
Creating this Jack Skellington Bling Phone Grip is a fun and creative way to celebrate your love for The Nightmare Before Christmas. Whether it’s Halloween, Christmas, or any day in between, this charming accessory will keep Jack by your side!
Designs For Cricut
cricut design
Cricut monogram designs
Cricut Shapes
Unique Cricut Sticker Designs
cricut watercolor projects
Cricut Cutfiles Collection